The Makowski’s Martial Arts & Fitness Student Area is your reference and guide to some of the commonly asked questions around the Do Jang.
- “How do you do that rear stance again?”
- “How do you choose a martial arts school?”
- “What do all those Taekwondo terms actually mean?”
The answers to these questions are here along with other helpful slides and information.
There is also some information for the parents too!!
Songahm Spirit of Taekwondo
These statements are said at the beginning and at the end of class. They serve as general sayings to live by, and to show respect for our martial art. They list the basic life skills that are inherent in Songahm Taekwondo.
Opening Statement:
Sir, I shall practice in the spirit of Taekwondo,
…with courtesy for fellow students,
…loyalty for my instructors,
…and respect for my juniors and seniors
Sir!
Closing Statement:
Sir, I shall live with perseverance in the spirit of Taekwondo,
…having honor with others,
…integrity within myself,
…and self-control in my actions
Sir!
Tiny Tigers
Tiny Tigers recite the Songahm Spirit, repeating after their instructor while motioning with their hands.
To be a good person (right hand raised);
…knowledge in the mind (point to head);
…honesty in the heart (right hand placed over the heart);
…strength in the body (make a muscle with the right arm and point to it);
…to make good friends (extend the right hand to shake hands);
…to do my best (both hands at the sides),
Sir!
Student Glossary
BARO [ba-ro]
Return to ready stance
CHARYEOT [cha-ryut]
Attention
DIRO DORA [dee-roe-doe-ra]
About face
DO JANG [Do-Jang]
Training hall or studio
DO BALK [Do-Balk]
Uniform
JOONBE [june-bee]
Ready
JWA WOO HYANG WOO [jaow-oo-young-oo]
Face to the right and left respectively
KAESOK [kay-soek]
Resume
KALYO
Break
KIHAP [key-hop]
Yell
KU KI E [koo-key-ay]
Face to flags
KUMAHN [koo-man]
Stop
KYEONG YE [kee-young-e]
Bow
SHIJAK [she-jak]
Begin
Rules of the Do Jang
- Students and instructors will bow to the flags each time they enter or leave the classroom area to demonstrate respect to the instructors and fellow students.
- If students are late for class, they should ask permission to enter class. Permission must be obtained to leave the classroom for any reason.
- Students will respond “Yes/No, Sir or Ma’am” in conversation with instructors, stand respectfully and address them by their last name and proper title.
- Students will turn away from instructor or opponent when adjusting uniform or belt.
- Students are encouraged to participate in class enthusiastically, however, they are to avoid unnecessary conversation.
- No student, regardless of rank, may instruct or correct another student without permission from the supervising instructor.
- A clean uniform is imperative in each class as a reflection of the student’s pride. Uniforms are to be clean and wrinkle-free.
- Female students must wear a white t-shirt under their uniform.
- Students will not wear shoes on the workout floor.
- No jewelry is to be worn on the workout floor. Earrings must be removed. Wedding rings are the only jewelry allowed.
- All belts should be tied to hang evenly, as one side represents the mind and the other side represents the body.
- Students may not engage in free-sparring without all proper gear and direct supervision of an instructor.
- There will be no use of profanity on the school premises at any time.
- Permission of the student’s instructor is required before a student may attend another ATA school or martial arts function.
- High ranking visitors to the class should be greeted with appropriate respect; if class is in session, all members should immediately stop and bow.
- Students, parents, and guest will not converse with any person involved in a class session without permission from the instructor.
- Students are encouraged to attend at least 2 classes a week but may attend more frequently.
- Student performance and advancement is judged on ability, attitude, and behavior.
- Students are expected to be on time and ready for class. Bring sparring gear to every class, males must wear groin protection to every class they attend.
- Line-up in a seated position while waiting for class to begin. PLease talk quietly and keep talking to a minimum.
- Those who attend family classes should attend a class for their age and rank during the week.
- No chewing gum is permitted on the workout floor. Please dispose of gum properly. Do not spit gum in the parking lot or in the grass. Someone could step on it. Please be respectful.
- No e-cigarettes. Thank you for not smoking or using tobacco products. This is a tobacco free campus.
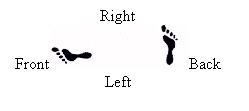
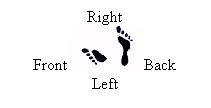
Stances
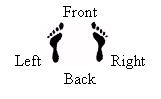
READY POSITION is a natural posture position. From it, you can move into any other stance. When in the stance, the feet are parallel to each other and about one shoulder width apart. The knees are slightly bent. Grip the floor with your toes.
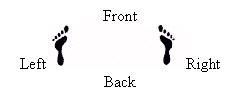
MIDDLE STANCE, sometimes called “horse stance” is one of the basic training positions. The feet are parallel to each other and about two shoulder widths apart. The knees are pushed out to the sides so that the legs are bowed. Grip the floor with your toes. You should feel pressure on the outer edges of your feet if your knees are pushing out properly. When looked at from the front, the stance should look as if the student is riding a horse. Since the stance is quite wide, it is very strong from the side. However, because the stance is not very long, it is very weak from the front and back.
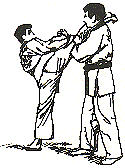
FRONT STANCE is a fighting position. From here, the student can move forward and back, turn and execute many techniques.
The feet are parallel to each other and about one and a half shoulder widths apart. The stance is about two shoulder widths long from front to back. The front knee is bent so that the student cannot see the toes of that foot. The knee of the rear leg is straight (locked out). The locking of the rear knee and flexing of the front allows the hips and upper body to squarely face the front. Keep the shoulders directly over the hips. Grip the floor with your toes. This standing position is extremely strong from the front. When pushed from the front, the student should not be able to be moved backward.
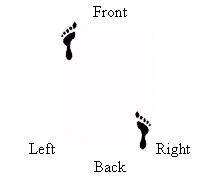
BACK STANCE is a fighting stances. From this position, the student can move forward and back, turn and execute many techniques.
Feet are perpendicular to each other and about one and a half shoulder widths apart. The heel of the forward foot points to either the heel of the midpoint of the base foot. The forward knee is bent and in line with the foot. The knee of the base leg is also bent, and pushed out to the side. The shoulders are directly over the hips and square. The upper body faces the same direction as the base foot, but head looks in the direction of the forward foot. Grip the floor with your toes. This stance is extremely strong from the side. In fact, when pushed from the side, the student should not be able to be moved backward. Also, when done correctly, the student should be able to kick with the lead leg without having to shift his/her weight.
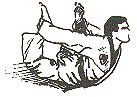
REAR STANCE is a fighting position. The student can move forward and back, turn and perform many techniques. When in the stance, the feet are perpendicular to each other and about 3/4 shoulder widths apart. The heel of the forward foot points to either the heel of the midpoint of the base foot. The forward knee is bent and in line with the foot. The heel of the forward is just off the floor. The knee of the base leg is slightly bent. The shoulders are directly over the hips and square. The upper body faces the same direction as the base foot, but the student’s head looks in the direction of the forward foot. Grip the floor with your toes. This position is excellent for kicking, since their is only a little weight on the forward foot. Most of the body’s weight in on the rear foot.
Songahm Taekwondo Belts

White Belt: This is where it all starts.”Pure and without the knowledge of Songahm Taekwondo. As with the Pine Tree, the seed must now be planted and nourished to develop strong roots.”

Orange Belt: “The sun is beginning to rise. As with the morning’s dawn, only the beauty of the sunrise is seen rather than the immense power.” The beginner student sees the beauty of Taekwondo but has not yet experienced the power in the technique.

Yellow Belt: “The seed is beginning to see the sunlight.” The student begins to see the basics of Taekwondo.

Camo Belt: “The sapling is hidden amongst the taller pines and must now fight its way upward.” The student begins to see his/her place in the world’s largest martial art. The student must now begin to spar in order to promote in rank.

Green Belt: “The pine tree is beginning to develop and grow in strength.” The student’s technique is developing power. The components of the basic techniques are beginning to work in unison.

Purple Belt: “Coming to the mountain. The tree is in the mid-growth and now the path becomes steep.” The student has crossed over into a higher level of Sogahm Taekwondo. The techniques, forms, and level of sparring become more difficult, creating a “mountain” that must be overcome.

Blue Belt: “The tree reaches for the sky toward new heights.” Having passed the mid-way point, the student focuses his/her energy upwards toward black belt.

Brown Belt: “The tree is firmly rooted in the earth.” At this point the student has mastered the basics and developed deep roots in Taekwondo.

Red Belt: “The sun is setting. The first phase of growth has been accomplished.” The first day (the period of time from White to Red belt) of growth is coming to an end. The physical skill has been developed, but lacks control. Therefore, physical and mental discipline must now be achieved.

Red/Black Belt: “The dawn of a new day. The sun breaks through the darkness.”

Black Belt: “The tree has reached maturity and has overcome the darkness… it must now ‘plant seeds for the future.'”
Requirements (PDF automatically downloads)
10 Ways to Achieve your Black Belt Goal
- Focus on the first step
What is important is that you focus on getting over the first hurdle. You must really work hard on the basics and build a solid foundation on which to grow. Therefore spend time on the simple techniques that you are shown first – having solid basics is the core for achieving a black belt. - Listen to your body
If you are not feeling 100% in training and your energy levels feel low, take a look at your daily lifestyle.School and work challenges, diet, emotional stress, and activity schedule can each cause a drain on performance. Avoid burnout by knowing your limits and scheduling activity responsibly. Two taekwondo classes a week will get you to your goal at a steady rate. Sure you can attend more often but that all depends on what other responsibilities you have. - Do what you enjoy
Being in the right class environment that you will enjoy is very important in keeping motivated for black belt training. If you enjoy a particular aspect of training, suggest to your instructor that you would like to do more of it (make sure you are respectful and your instructor will welcome your feedback). - Visualize achievement
To get through a particular hard training session visualize how you will feel at the end of it. Be positive and imagine how you will feel during the cool down, knowing that you have maintained maximum effort throughout. Looking long term, visualize how it will feel to put your black belt on and the respect you will get from fellow students. - Resist the temptation to be lazy
The one simple fact you should remember is that a black belt is only achieved through hard work and commitment. Students who regularly attend classes, demonstrate good ability, attitude, and behavior will be the students who achieve their black belt. - Set yourself achievable goals
It is important to set goals that can be reached. Start with goals that are easy and that are stepping stones toward your bigger goal. Examples are:- Do all of your basics to the best of your ability
- Be a leader in class
- Answer up loud and show respect in class
- Train an extra session a week
- Eat a more balanced diet.
- Earn your next knowledge stripe by a target date
- Shake down that old routine
Training doesn’t always need to be the same. A good black belt knows kicks, strikes, blocks, board breaks, sparring, ground fighting, self-defense, physical fitness, speed training, and much more. Your training should be a little different in each class that you attend. - Monitor your Progression
You need to do and learn. That means you must focus your attention so that you are able to do the techniques and tasks that are presented in class. You should practice them in your mind and with your body so that you can do them well even when you aren’t in class. - Plan your training time on a weekly basis
If you really want to achieve your black belt you should plan to participate in class at least twice a week. If you know that for a particular week you may not be able to make the class time, ask your instructor for other ways to make it up. Perhaps you can attend additional classes before you leave or the following week when you return. You can also practice your techniques or forms independently before you go to school or work. - Reinforce the reasons why you train
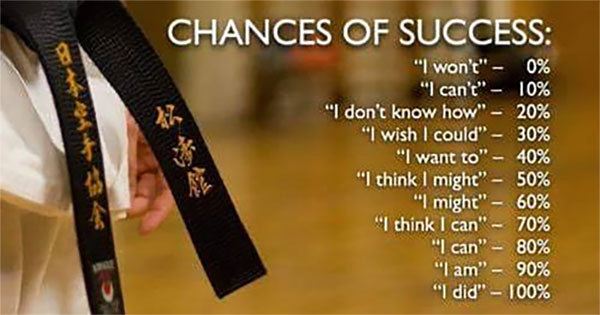
What is the main reason why you train? The attitude you need to have is that you want to stay committed and dedicated not because you have to, but because you want to. To get to the black belt you have to train hard and set goals that you can achieve, so it’s important to reinforce the values of your training.It’s the journey that is important. Gaining the black belt rank is only the beginning of black belt training. Practicing the proper attitude by setting high goals and achieving greater black belt experience is a lifelong model for success.Celebrate your success! Take time to enjoy your progress and remember that you are successful and a winner.Training for a black belt is no easy task. It requires dedication and a lot of hard work. To achieve the first degree black belt rank will take about three years. Here are ten pointers to help keep you stay focused and motivated to achieve that black belt.
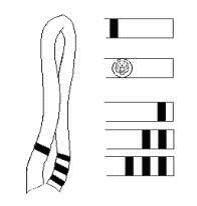
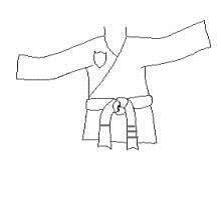
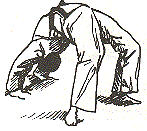
How to Tie a Double Wrap Belt
Begin by finding the center of the belt by folding the belt in half.
The Rank Stripe, or high stripe shown pictured first should start on the student’s left side. Decided rank Tiny Tigers will have an animal patch, instead of a rank stripe.
Knowledge stripes (shown to the right), or the stripes placed closer to the edge of the belt should begin on the student’s right side under their ATA Patch on the uniform jacket.
Holding the center of the belt on the student’s stomach, wrap the right side (knowledge stripe side) around the waist first, then place the left side (rank stripe side) on top and wrap it around waist (on top of the right side you first wrapped).
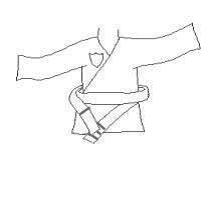
Take the rank stripe side (which should be wrapped on top) and tuck it underneath the knowledge stripe side and the center of the belt to hold all pieces of the belt firmly together.
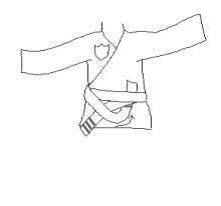
Cross both sides of the belt to make an “X” shape. Take the bottom side (knowledge stripe side) and bring it up and then down through the opening in your “X”. Pull firmly and twist the belt ends downward to finish the knot.
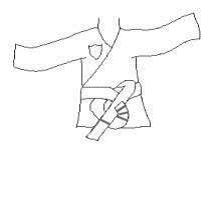
Properly tied belts should end with the rank stripe on the right side of the uniform under the ATA patch on the uniform jacket and knowledge stripes on the left side of the uniform. Both ends of the belt should be equal in length.
Tournaments
Tournament FAQs
Q: Who can participate in a tournament?
A: Any active ATA student. Competition is divided for all ages and skill levels.
Q: What does a student do at the tournament?
A: Students will compete with their form. White, orange, and yellow belts also compete with one-steps #1 and #2. Camo belts and above compete in point sparring with gear. Hand gear, foot gear, head gear, mouth guard, and athletic cup (for males) is mandatory.
Q: What is weapons competition?
A: All students (White through 5th Degree Black Belt) can perform their own creative form. Their freestyle form is not to be longer than twenty seconds. Colored belts may compete with the Single & Double Ssahng Jeol Bong, Single & Double Bahng Mahng EE or the Jahng Bong. Black belt competitors must perform the weapon form that is required for their rank.
- All 1st through 5th Degrees must compete with the ATA Protech weapons forms. All ties will be decided by performing the form one more time, and an additional creative free-style.
- 1st Degree Black Belts may compete with the Single Ssahng Jeol Bong, or Single Bahng Mahng EE.
- 2nd Degree Black belts may compete with the Single/Double SJB, or Single/Double BME.
- 3rd Degree Black Belts may compete with Single? Double SJB, or Single/Double BME or the Jahng Bong.
- 4th & 5th Degree Black Belts may compete with the Single/Double SJB, or Single/Double BME or the Jahng Bong or Sam Dan Bong.
Q: How are competitions scored?
A: Forms – there will be three judges rating forms on a scale of 9.0-9.9. The three highest scores will win first, second and third place trophies.
One-steps (white belt/orange belt/yellow belt)- the judges will raise a red or white flag indicating which one-step was performed most accurately. When a student has earned two points they will move on to compete against another competitor.
Point sparring (camouflage belt through black belt)- the judges will raise a red or white flag indicating which competitor scored the point. Points are determined by certain techniques being directed to specific areas. When a student has earned five points or whoever has the most points at the end of two minutes, will continue on to another competitor. Four trophies are also awarded, the same as in one-step sparring.
Q: Why should a student compete in a tournament?
A:
- It is fun!
- Competition teaches sportsmanship
- Self-confidence is developed
- It provides children and opportunity to compete successfully in their sport and to meet other students and instructors.
- A team and winning attitude connects the students with their classmates.
- Mental self-control is demonstrated competition situation.
Everyone is a winner for participating in a tournament. Children not placing 1st, 2nd or 3rd will receive a 4th place VICTORY trophy and students will receive a red star for their victory patch.
Tournament Requirements
All students are invited to sign up for in-school, regional, national and world ATA Tournaments. Tournament competition events include forms, sparring and weapon competition.
In order to compete at an ATA tournament in form competition, students must have their instructors permission and know at least one form, either their current belt form or the last belt form they tested with. For example, a newly promoted orange belt who does not yet know his whole form, is permitted to do his white belt form with no detriment to his score. The student must know ALL of at least one form to compete, partial forms, however nicely done, are not acceptable.
Sparring competition is traditionally held immediately following forms competition within the same ring. Students not competing in sparring for any reason must stay in their ring until their judges dismiss them. White, orange and yellow belts will do one-step sparring with a partner, while camo belts and above will free spar for points. White, orange and yellow belts will compete only with one-steps number 1 and 2, so knowledge of one-step 3 is not needed to compete. Even if a new camo belt plans to compete with his yellow belt form, he/she MUST compete in a camo belt ring. Camo belts and above are not permitted to compete with one-steps for any reason. Camo belts and above are required to bring all necessary sparring gear including hand and foot pads, head gear, mouth piece and groin cup for males. Students without proper gear will not be permitted to spar. Shin pads and other additional protective gear are optional. Students should not wear gear into their competition ring, as they will be given time to put on their gear following forms competition. Weapons competition is optional and may require an additional registration card and fee. Students competing in weapons are required to bring their own weapons.
All competitors are invited to arrive early to avoid missing their competition. Students should arrive either in uniform, or in dress attire with their uniform present to change into before competition.
Daily Dozen Stretches
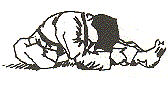
1. We’ll start by stretching the groin and legs without stressing the knees. Slowly reach for your foot, with your face down toward the knee. Maintain the extended stretch position for seven seconds; relax for three seconds; extend again. Repeat three times on each side. (Remember to breathe normally and don’t bounce!)

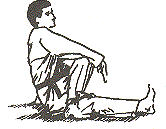
2. Sit on the floor, feet together; reach for your feet, face toward knees. Maintain extended stretch position for seven seconds. Repeat three times. Remember to breathe normally. (As you exhale, try to extend a bit more.)

3. With feet extended to a stretch but comfortable position, reach out in front, trying to put chest on the floor. Don’t bounce, and breathe normally as you hold for seven seconds; relax for three seconds. Repeat three times. Don’t be concerned if your “splits” aren’t wide. You will gradually improve.
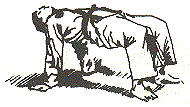
4. Sit on the floor with your knees up; place your hands on the floor, fingers pointing back. Lift to “table-top.” Keep your torso level…no sagging! Relax your head, letting it drop. Hold position for seven seconds; lower to floor and relax for three seconds. Lift again. Repeat three times.
5. Place your foot flat on the floor, next to your knee. Place your bracing hand close to your body, and keep your back very straight. As you twist, keep both buttocks flat on the floor. Maintain twist for seven seconds; relax for three seconds. Repeat three times on each side.
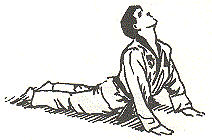
6. Place your hands under your shoulders and lift, arching your back while keeping your hip bones flat on the floor. Maintain stretch for seven seconds; relax for three seconds. Repeat three times.
7. Reaching behind you, grasp your ankles, and arch your back. Lift your ankles higher to improve stretch. Maintain position for seven seconds; relax for three seconds. Repeat three times.
8. Lie flat on your back, extend arms straight out, palms down. Raise both legs together until they are straight up. Lower legs to left side while turning face to the right. (Do not let legs rest on the floor.) Raise legs to straight up position again. Lower legs to right side while turning face to the left. Raise legs to straight up position again. Lower legs to right side while turning face to the left. Raise legs to straight up position again. Lower legs to right side while turning face to the left. Raise legs to straight up position again. Lower legs slowly to the floor. Repeat three times.

9. Lie flat on the floor with legs together. Raise legs together until toes touch floor behind head. (Don’t be concerned if you cannot touch the floor with your toes. Maintain control at first by bracing your back with your hands, and you will improve.) Maintain position seven seconds. Lower legs slowly. Relax for three seconds; repeat three times. Remember to breathe normally.
10. Lie on floor with knees up. Hands are placed next to your head, palms down, fingers pointing toward your shoulders. Arch back and lift. Hold lift for seven seconds; slowly lower to floor. Relax three seconds and lift again. Repeat three times.
11. Support heel on a table top or bar (or have a partner hold your heel). Bend the standing (back) leg with toes turned outward. Reach for foot, stretching face slowly toward the knee. Maintain stretched position for seven seconds; relax for three seconds. Repeat three times on each side.
12. Support side of foot. Pivot standing foot with toes pointed out. Keeping back straight, stretch toward extended foot. Maintain stretched position for seven seconds; relax for three seconds. Repeat three times on each side.
How to Benefit From the Martial Arts
Benefits of Martial Arts
- Balance your martial arts goals among physical, intellectual and value-oriented goals. Obviously, if you’re a beginner, this can be a difficult task but the school that you choose should support your goals and make it easier for you to succeed.
- Start by identifying basic goals, such as learning common commands in Japanese or Korean (depending on the martial art you practice), showing courtesy to another student, showing respect for the instructors and school. You will be able to identify advanced goals as you develop experience in the style. Your instructors should provide you with help in setting goals.
- Keep your goals specific, measurable, and realistically able to be achieved within a period of time.
- Track your progress toward achieving goals. Keep a notebook or journal to record instances of your performance boh during and outside of classes..
- Share your goals with instructors and other students. Encourage others to share their goals with you.
- Encourage students, friends and family members to provide you with both positive and negative feedback.
- Recognize short-term and long-term progress and celebrate your successes.”I’ve lost 14 pounds…” (after taking classes for 4 weeks)
How to Choose a Good Martial Arts School
Steps to Choosing a Martial Arts School

- Look at the scope of services being offered by every school you consider.
- Have a phone chat or make a personal visit before trying a class. Ask to speak with the instructor(s). Determine if the instructor(s) are the owners of the school.
- Ask about the ages and experience levels of the students that attend each class. Ask how many students are in a class. And, ask about the number of instructors in a class and their experience as instructors too.
- The instructor’s experience and comprehensive knowledge are vital to your success and satisfaction. Ask what the instructor can do for you and what they do (and have done) for others. Ask about the claims that they make in their advertisements, and, in particular, ask about their credentials and certifications that match their claims.
- Are the instructors experienced professionals, school owners, and active teachers? Do the instructors continue to train too? References are great; especially from community leaders, organizations, and other students.
- Don’t go simply by instructor titles or awards they may have won. The awards should be consistent and relative to the instructor, not merely representative of unrelated moments in time (Ask: When was the award earned?; At what rank was it earned?; With whom did you earn your black belt?: How long have you been training?; etc.). Understand that this choice is about YOUR TRAINING and what you can accomplish.
- Being nearby is only the best option if everything fits. Ask yourself, “Is this choice fast food or a ‘quality-first’ service provider.” Would you go to the church on the corner if it did not share your beliefs? Would you go to the convenience store to buy a steak dinner? Why choose the martial arts school down the street just because it is closer?
- Choose instructor(s) that you are comfortable learning from and who can provide the best quality instruction. Listen and take note of the questions they ask of you. There is a significant difference between “selling” and “service” which are easily discerned by listening closely and asking the right questions.
- Arrange to take an introductory class from the instructor with whom you feel you have some connection. You’ll be spending hours together in class.
- Pay attention if the instructor can clearly explain what they want you and the class to do.
- Is the workout floor large enough to accommodate the class (there should not be downtime and taking turns to workout)?
- What is the workout floor made of (good martial arts floor mats are the best training surface). Puzzle mats, wood, and carpeting are poor choices and a risk to a student’s health and well-being.
- Is the location clean (take a look in the changing rooms and rest rooms too)?
- Is the school easily accessible?
- Is there sufficient parking?
- Is there a visitor viewing area?
- Ask for the full cost per lesson or a package.
- What are the monthly fees and family discounts?
- What are testing fees?
- How frequently is testing offered?
- What equipment fees are required?
- What is the class schedule?
- What ages and skill levels are in each class?
- What other opportunities are offered, e.g., special classes, tournaments, events, etc.?.
- Decide if there is a quality exchange of services for the cost of the training?
- Assure that the desire to learn is matched by the best training that you can arrange.
- If you choose to do a trial offer, use it wisely and check off your findings. Be sure that you are completely satisfied . . . because you deserve the best.
A Short History of Taekwondo
Taekwondo can be traced back to ancient Korea. The only documented history begins around the middle of the 1900’s. The exact start is unknown but it is believed that it originates from a Korean martial art known as t’aekyon practiced around 1,300 years ago.
Near the beginning the 1900’s the art transformed with the introduction of Japanese and Chinese techniques. This bothered some because the influences didn’t carry on the traditional values, philosophy, and the kicking power associated with the old ways.
On April 11th, 1955, Taekwondo became official!! General Hong Hi Choi organized the various Korean martial arts styles and presented the name Taekwondo to a committee that was made up to decide on this title. From then on, Taekwondo was recognized as the new, officially recognized Korean martial art.
Tae = kick or jump
Kwon = fist or hand
Do = “the way”
Taekwondo = “The Way of the Hand and Foot.”
Towards the 1960’s, Taekwondo started spreading internationally and evolved into primarily a combat sport with self-defense, fitness, and the philosophy still remaining at critical elements of Songham Taekwondo, the style developed and supported by the ATA.
Taekwondo is currently the most popular martial art in Korea, and stands among the worlds most popular martial arts!
Songahm Taekwondo
The “Songahm Star” is the pattern that is formed on the ground if all 18 forms of the Songahm system are completed. In a perfect Songahm Star, the distance from the center point of the star to the top point is nine feet (“feet” being the student’s foot length). The total distance from the top point to the bottom point equals 18 feet, representing the number of forms in the Songahm system.
“Martial Art” is a broad term encompassing the many styles of physical discipline (fighting) arts that have been developed over the centuries. To say that the style of Songahm Taekwondo is just another “martial art” would be an oversimplified explanation of the world’s largest centrally administered martial art. This system of teaching and training is unequaled in the martial arts community.
During its early years, the ATA used the Chahng-hun style of forms (also used by the International Taekwondo Federation). But although this style was widely accepted in the Taekwondo community, Eternal Grand Master H.U. Lee felt that its forms did not accurately reflect Taekwondo — particularly the strength and beauty of Taekwondo kicking techniques. As a result, he believed the forms contributed little to the Taekwondo curriculum. For example, white belts were expected to know front kicks and side kicks, but no front kick appeared until the third (yellow belt) form, and there was no side kick until the form after that!
From 1983 to 1990, Eternal Grand Master introduced the eighteen Songahm forms. These forms are part of a fully-integrated curriculum, in which everything a student learns reinforces everything else. The forms contain all or nearly all of the techniques that students are expected to know at each rank, the one-step sparring segments complement the forms, and all of these patterns lead logically to the movements required for each succeeding rank.
The Songahm curriculum facilitates a smooth progression from one rank to the next, so that students who begin Taekwondo feeling they’ll never be able to do a simple block (for example) suddenly find themselves a few years later doing 360-degree jumping kicks with ease.
Songahm Taekwondo also focuses on personal development of the mind and body. To say it is just self-defense would be to lose most of the valuable ideas and philosophy behind this ancient art.
The heightened capacity for self-defense resulting from our Taekwondo is really a fringe benefit that is gained by dedicating one’s self to the values, philosophy and training of Songahm Taekwondo. When learning, a student is in a true, traditional Taekwondo class, focusing not just on the physical but also on discipline, honor, self-control, respect, courtesy, perseverance and loyalty.
A beginner does not focus on being a skilled martial artist within a month or two, as a strong foundation in Taekwondo must be built first. Trying to advance beyond your level without proper guidance is like building a house on concrete that has not dried. Though the house may still stand, the foundation would not be as strong and the appearance of the house may not be as presentable.
The ATA and its affiliated organizations help build a strong foundation of Songahm Taekwondo in each of its members, a foundation from which advancement in both the martial art (mind and body) and in self defense can be built and added on to in perpetuity.
Source = www.ataonline.com